
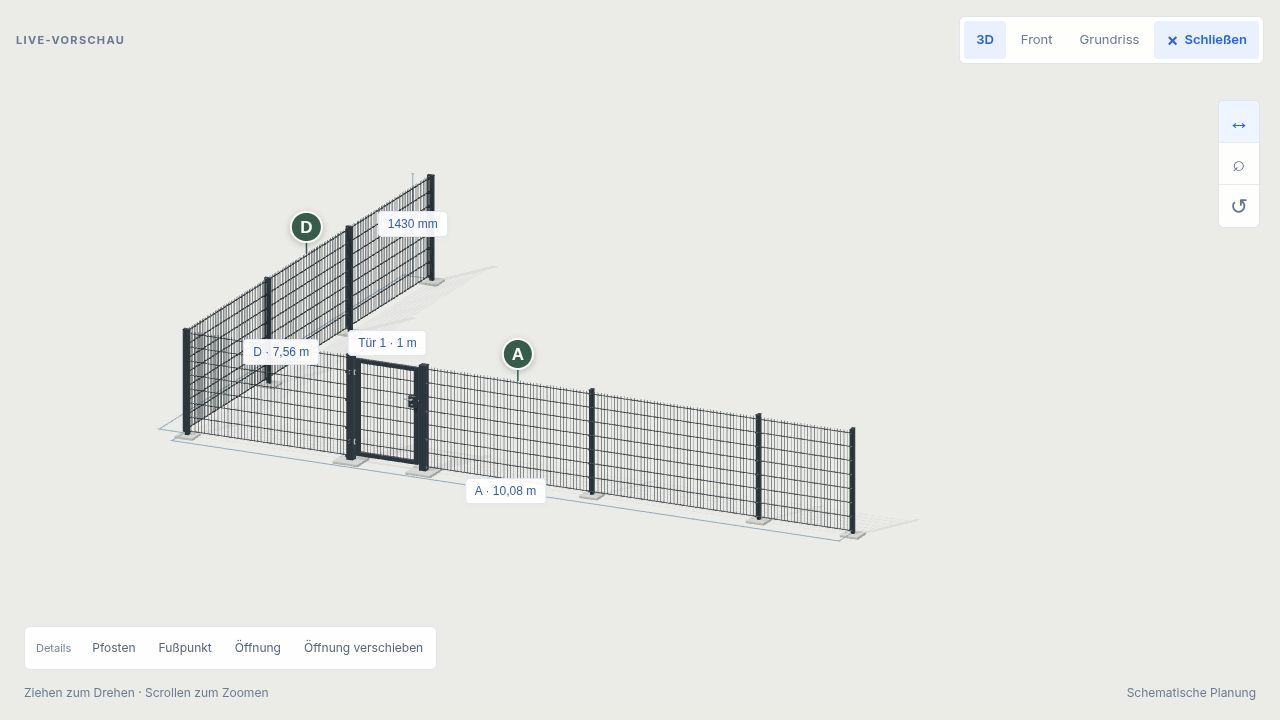
Here is what the planning example looks like in the rotec fence configurator: two fence panels and a gate. The image shows the actual, schematic 3D preview. This example is not an actual customer installation.
Guide · Fence Planning
Specify the dimensions, select the design, and visually verify the fence layout before submitting your request.
With the rotec Fence Configurator, you can plan your double-wire mesh fence online and review it in a rotatable 3D view. You specify the fence layout, dimensions, and design, add doors or gates, and view the calculated material requirements. You can then request a no-obligation quote.
Plan your fence project here in 3D. The configurator combines a 3D preview with a material estimate. The material price displayed includes 19% VAT. Shipping and installation are also factored in.
For which fence projects is the configurator suitable?
This introduction is suitable for private properties, residential complexes, and commercial outdoor areas that are to be fenced with rotec double-bar fencing. Metal fabricators and planners can also use it to prepare an initial layout. The preview is particularly helpful when multiple sides, a corner, and different access points come together.
This makes it possible to identify early on how the fence divides the property and where a passageway would be most practical. At the same time, it provides a concrete basis for further coordination with rotec. For special security requirements, challenging connections, or custom designs, our specialized department supplements the online planning.
The following shows what other systems rotec offers: Overview of Our Fencing Systems. This article walks you through the planning process using the double-bar fence configurator.
What should you have ready before planning your fence?
A simple sketch of the property is all you need to get started. Mark the sides to be fenced and any existing entrances. Also indicate any walls, changes in elevation, and areas where posts cannot be installed. This information will be helpful later during the technical planning phase.
| Information | What it's used for |
|---|---|
| Fence Line | Which sides are being fenced off, and where do they meet? |
| Side lengths | In the configurator, the distances between the centers of the outer posts apply, including planned openings. |
| Fence Height and Design | Height, wire gauge, surface finish, and mounting method determine the choice of components. |
| Doors and Gates | You'll need the desired clear width and the position on the respective page. |
| Installation Situation | The project description should include information on the subgrade, slope, existing structural components, and any special requirements. |
| Project Location and Scope of Work | Please specify whether you would like to pick up the materials or need them delivered and, if applicable, installed. |
For now, treat unknown dimensions as open issues. Before proceeding, the actual installation conditions and final dimensions must be confirmed.
Step 1: Which sides do you want to fence in?
First, select the front, left side, right side, or back. The property sketch immediately displays the selected sections. For example, you can plan just the front or combine multiple sides.
For the example used throughout this article, we will choose Front and left side. This results in an L-shaped layout. Click „Continue to Dimensions“ to view the features. If your lot has a different shape, the setup screen also offers the option „Configure a non-rectangular fence.“.
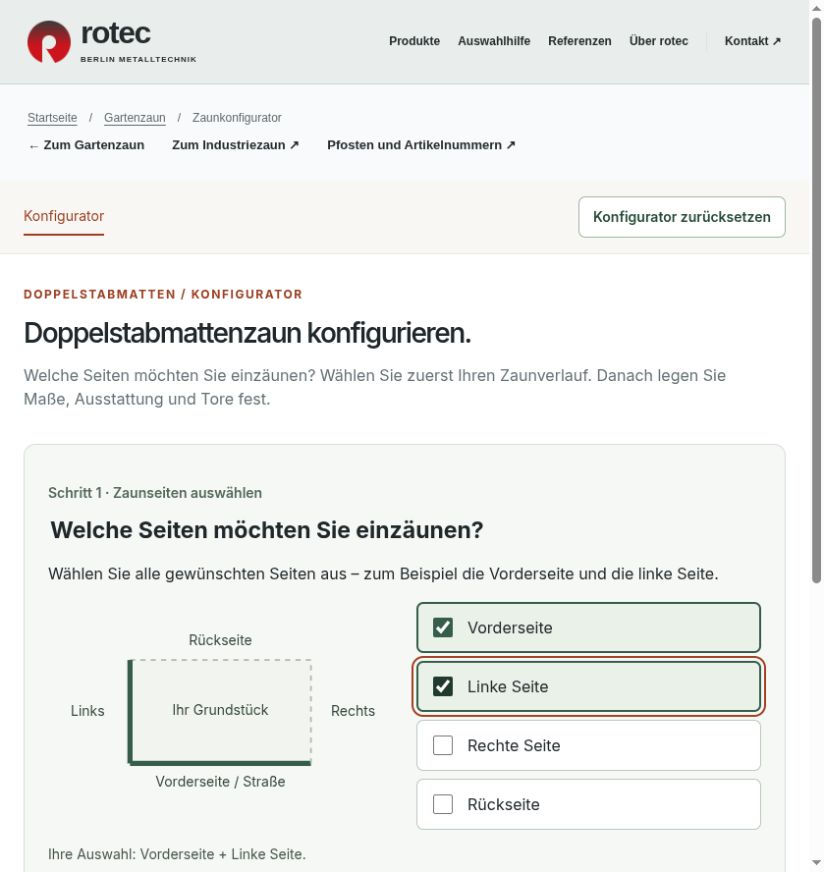
The first step is to define the fence line. In this example, the front and left sides are selected.
Step 2: Enter the fence lengths correctly
Enter the length in meters for each selected side. The tested configurator allows for lengths ranging from 0.60 to 400.00 m per side. The measurement reference is crucial: Measurements are taken between the centers of the outer posts on each side.
Any door or gate included in the plans is part of the total length. The opening is positioned within this range. Therefore, do not subtract its width from the entered side length in advance. Similarly, the center-to-center distances of the posts and the outer edges of a finished structure are not the same.
Our example uses 10.08 m on the front and 7.56 m on the left. You can read about the measurement reference in the drop-down explanation next to the input field. Later, the „Layouts & Cuts“ section shows how the entered length is distributed across the individual fields. Be sure to check there for any possible deviations caused by the cutting grid.
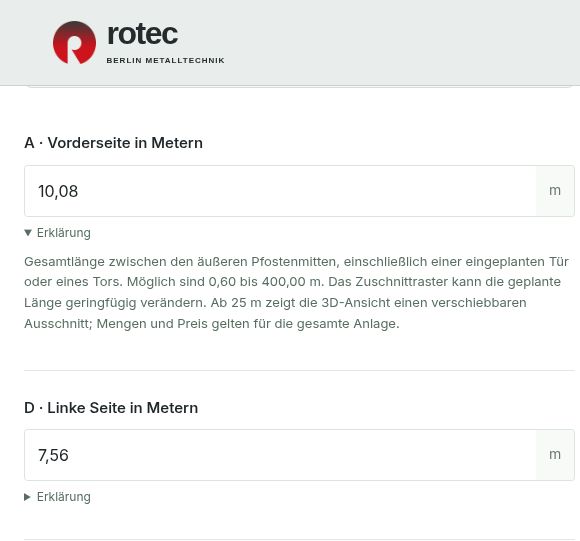
The side length includes the entire section, including any planned openings. The explanation in the configurator specifies the post centers as the reference.
Step 3: Select the height, double-bar fencing, and surface finish
What height and wire gauge are appropriate?
The configurator offers mat heights ranging from 630 to 2430 mm in incremental increments. The choice depends on the purpose of the fencing and the requirements of your project. For our example, we’ll set it to 1430 mm.
When it comes to wire gauge, there are two types: 6/5/6 and 8/6/8 mm. These designations refer to the diameters of the two horizontal wires and the vertical wire. For 8/6/8 mm, the horizontal wires are each 8 mm thick and the vertical wire is 6 mm thick. We’ll use this heavier version in our example.
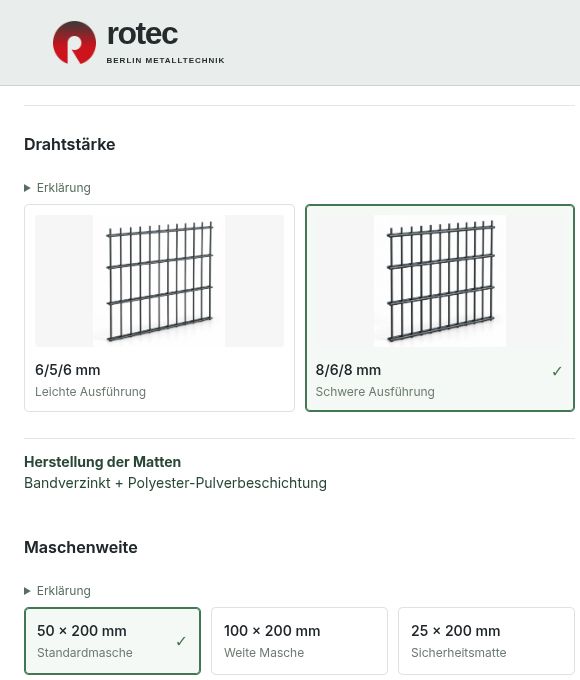
This selection explains the construction of the light and heavy double-bar fencing. In the example, the setting is 8/6/8 mm.
The standard mesh size is 50 × 200 mm. This results in the typical narrow, tall rectangular shape. The configurator also displays other mesh sizes. An upper bar overhang can also be taken into account. The appropriate combination should be suited to the application site; individual selection criteria alone do not guarantee suitability for a specific protection concept.
Pre-galvanized wire and hot-dip galvanized versions
For the colored rotec double-bar fences in the configurator, pre-galvanized wire is combined with an additional polyester powder coating. You can choose between Anthracite RAL 7016 and Moss Green RAL 6005. A hot-dip galvanized version without an additional color coating is also available.
Compare the manufacturing method along with wire diameter, operating conditions, and desired surface finish. Our Buying Guide for Rotec Double-Bar Fences explains these differences in more detail.
Posts, Mounting, and Privacy Screening
Specify the post design and installation method. The configurator includes, among other things, cover strips, clamps, U-brackets, and clamps, as well as the options for setting in concrete, anchoring with dowels, and L-block or edge mounting. The selection made in the program must then be compatible with the existing substrate.
Post caps and privacy screens can also be taken into account. For privacy screens and special installation situations, we determine the necessary fastening method on a project-by-project basis. For more information on other options, please see the Post Dimensions and Accessories.
Step 4: Plan for Doors, Gates, and Passages
First, select the side of the fence where you want an opening. You can then add a single-leaf door, a double-leaf gate, or an open passageway. In addition, the configurator offers rotec sliding gates with double-bar or single-bar infill. For priced doors and gates, the available widths depend on the selected model.
In this example, we'll place a single-leaf door with a clear width of 1.00 m on the front elevation. We'll enter 2.52 m from the start of the side as the position. This distance extends to the center of the first door jamb. The direction of the arrow in the floor plan helps with alignment.
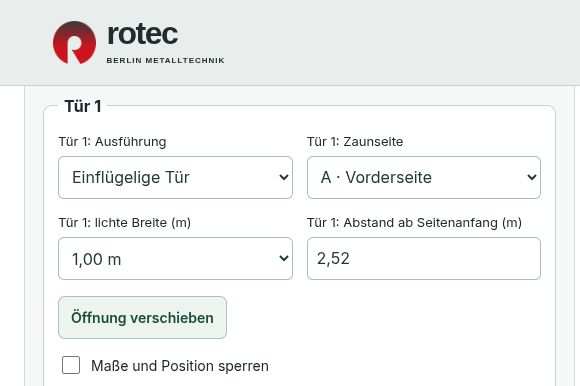
The door width and position are entered separately. „Clear width“ refers to the clear passage between the posts.
The clear width is not the total installation dimension of the gate system. The configurator uses additional post dimensions for preliminary planning; rotec will confirm the actual installation dimensions. Directly adjacent doors and gates that share a post should also be taken into account during the consultation. For further selection, the Overview of rotec Doors and Gates to the relevant topic.
Step 5: Review the 3D design, front view, and floor plan
In the 3D view, you can rotate and zoom in on the fence model. This provides a clear spatial understanding of the fence’s layout, height, and the location of the gate. The front view and floor plan complement this perspective. The full-screen mode provides more space for review.
In the floor plan, you can move any unlocked openings. The dimension fields are used for precise input. Be sure to check, in particular, whether the door is on the correct side and whether the access to the paths on your property is appropriate.
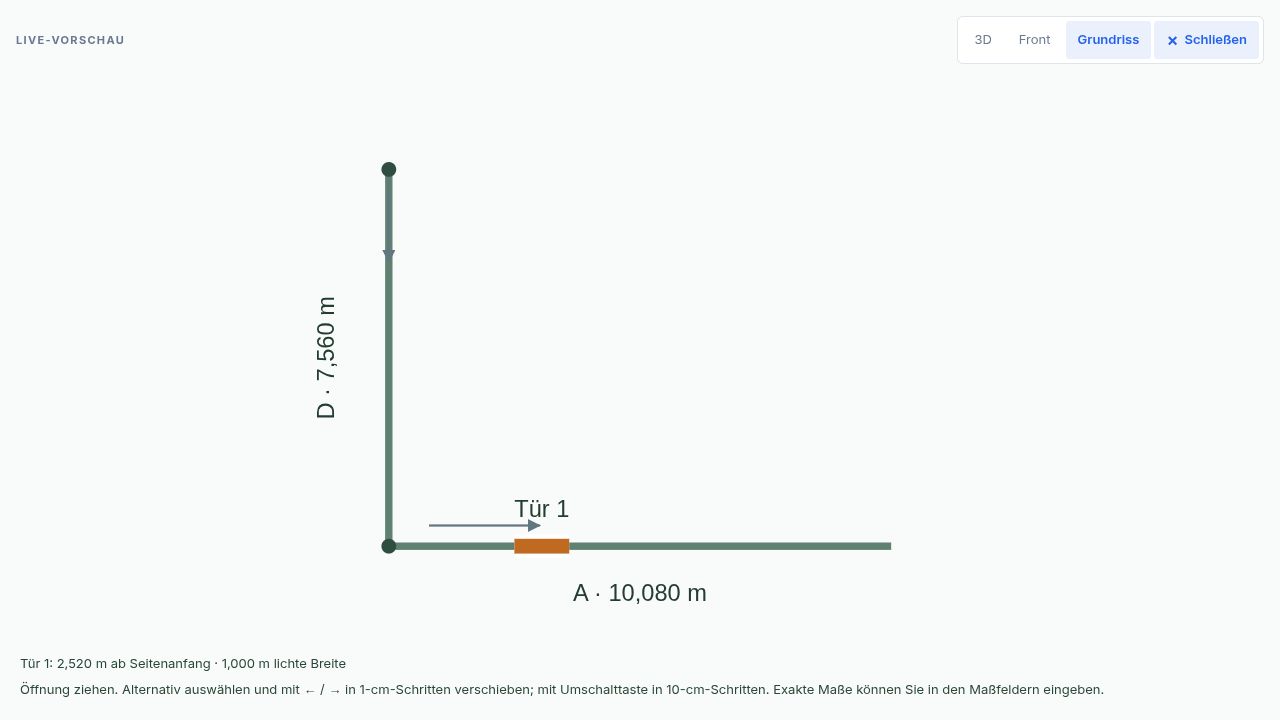
The floor plan shows the layout of the fence sections and the location of the gate. It complements the 3D rendering.
The preview remains a schematic plan. It does not replace on-site measurements or the technical clarification of foundations, connections, or site conditions. For longer distances, the 3D view displays a scrollable section starting at 25 m; quantities and prices still refer to the entire configured system.
Step 6: Understanding Material Requirements, Cut Lists, and Pricing
Based on the information you enter, the configurator calculates a recommendation for mats and posts. Doors and gates appear as separate items, including the corresponding gate posts. You must therefore distinguish these posts from the standard fence posts.
Under „Material Requirements and Unit Prices“ and „Dimensions & Cuts,“ you can review the breakdown in more detail. If necessary, you can adjust the material quantity. You should make such changes deliberately, for example, if you need to account for existing components.
| Position | Classification |
|---|---|
| Configured Material | Calculated components and selected features based on the current configuration. |
| Value-Added Tax | The material price shown includes 19% value-added tax. |
| Transportation | Not included in the initial material price. The delivery location and shipping costs will be addressed separately during the quote process. |
| Mounting | Additional services, the scope and price of which are determined on a project-by-project basis. |
Therefore, compare variants based on the same scope of services. A change in the material price initially reflects the new component selection. Depending on the circumstances, delivery, installation, and other agreed-upon work may need to be added to the total cost of your project.
The Planning Example at a Glance
The screenshots in this article are taken from a sample design in the rotec configurator. They do not represent a customer order or a standard fence package that can be applied across the board.
| History | Front: 10.08 m and left side: 7.56 m, measured between the centers of the outer posts in each case. |
|---|---|
| Mats | 1,430 mm high, 8/6/8 mm, standard mesh size 50 × 200 mm. |
| Surface | Anthracite RAL 7016, pre-galvanized wire with a polyester powder coating. |
| Post | Cover strip, for embedding in concrete, with plastic caps. |
| Opening | A door with a clear width of 1.00 m on the front; located 2.52 m from the start of the side. |
| Privacy screen | Without privacy strips. |
For these settings, the configurator identified seven panels, six standard posts, and one corner post during the check. The door, including its posts, was also listed as a separate item. The cutting layout showed that one panel would need to be cut to size. Even a different door position can change the layout of the sections.
Therefore, do not simply apply the sample quantities to your property without checking them first. Start with your own measurements and verify the resulting calculation.
In what other ways does rotec provide support beyond the configurator?
The best way to discuss an existing foundation, slope, or connection to a wall is through photos and a sketch. Special dimensions, custom gates, and additional security requirements also require specific technical coordination. Our specialized department will integrate this information into your online plan.
rotec operates a warehouse and its own metalworking facility in Berlin. This allows us to combine our selection of standard parts with project-specific additions. We coordinate material availability, pickup, delivery, and installation for each specific project.

Double-bar fencing being loaded, photographed for the rotec blog. In addition to online planning, we coordinate materials, delivery, and the desired installation.
This article explains how rotec combines consulting, materials, and installation Buying a Fence in Berlin: Fence Construction and Installation. When it comes to enclosing waste containers, the Instructions for the Separate Waste Collection Site Configurator for proper planning.
How does fence planning turn into a request for a quote?
Click „Request a Non-Binding Quote“ to go to the summary page. There, select either delivery or pickup at rotec Berlin. If you choose delivery, you’ll be asked for the ZIP code of the project location. Enter your name and email address; your phone number and any comments are optional on the form.
In the comments field, you can list any outstanding issues, such as installation requirements, slope, or a connection to existing components. The request process includes a configuration with a price breakdown sent as a PDF via email. Please double-check the dimensions, features, and scope of services before submitting. The form explicitly states that the inquiry is non-binding and does not constitute a paid order.
For additional photos or plans, you can also visit the rotec Project Inquiry with Attachments available. This allows our technical department to work with you to determine the installation requirements.
Frequently Asked Questions About the rotec Fence Configurator
Do I need to sign up for the fence planning session?
You can start planning right in your browser. The tested process does not require you to log in. Your name and email address are only required when requesting a quote; when it comes to delivery, you’ll also need to provide the delivery ZIP code.
Can I plan just a single side of the fence?
Yes. For example, select only the front side. You can also combine multiple sides. For non-rectangular fences, there is an additional option in the setup menu called „Configure Non-Rectangular Fence.“.
What length do I need to enter for a side with a goal?
Enter the total length between the centers of the outer posts. A planned gate will be located within this span. Its width is not subtracted in advance. The clear passage width and the total installation dimension remain separate measurements.
What do 6/5/6 and 8/6/8 mean?
The numbers indicate the wire diameters in millimeters. Two horizontal wires support a vertical wire. For 6/5/6 mm, there are two 6 mm wires and one 5 mm wire; for 8/6/8 mm, there are two 8 mm wires and one 6 mm wire.
Are mats made of pre-galvanized wire also available?
Yes. The colored rotec double-bar fences in the certified configurator combine pre-galvanized wire with a polyester powder coating. A hot-dip galvanized version without an additional color coating is also available. The appropriate version depends on the project.
Can I take privacy into account?
Yes. The configurator offers the option of no privacy screen, a privacy screen covering the upper half, or a full-height privacy screen. Work with the technical department to determine the appropriate design and mounting method for your location.
Can door positions be changed later?
Yes. You can change the position using the dimension field. In the floor plan, you can also move unlocked openings. Then check the field layout and the newly calculated quantities.
Why does the 3D view show only a section of long fences?
For lengths of 25 m or more, the preview uses a scrollable section. This keeps the display clear and organized. According to the configurator, the quantities and price still refer to the entire system entered.
Does the price shown already include the full installation cost?
No. The material price shown includes 19% VAT. Shipping and installation are billed separately. The specific services and their costs will be tailored to your project.
Can I plan a fence on a slope entirely online?
Use the configurator to create an initial design. The height profile, steps, post lengths, and ground connections must match the actual conditions on site. Please send the technical department a sketch with height specifications and photos.
Does submitting a request for a quote mean I'm making a binding order?
No. The inquiry form explicitly states that this step is a non-binding inquiry that does not result in a chargeable order. The desired scope of delivery and installation can then be coordinated with rotec.
What should I do if a required version is missing?
Please describe the deviation in the comments field or contact our specialist department directly. Photos, measurements, and a sketch will help us evaluate a custom solution. If a specific option is not listed, it does not necessarily mean that your project cannot be implemented.
Continue planning your fence project with rotec
Start by exploring the layout of your property and check out the features in 3D. Our expert sales representatives are here to assist you with any technical questions. Andreas Linse and Eren Erarslan. Both are part of rotec's technical department and will assist you with implementation, quotes, and orders.
Andreas Linse
Specialty Sales Representative · rotec Specialty Department
030 789039-45
info@rotec-berlin.de
Eren Erarslan
Specialty Sales Representative · rotec Specialty Department
030 789039-11
e.erarslan@rotec-berlin.de
rotec Berlin Metalltechnik GmbH
Werner-Voß-Damm 58 · 12101 Berlin
Plan your fence project in 3D now → Request Technical Consultation

 EN
 DE
 ES
 FR
 IT
 NL
 PL
 TR